Last week, I talked about my journaling Bible and the tools I use as I am reading. This week, I want to focus on the tools I use for illustrating my journaling Bible.
Pencil.
You can use whatever pencil fits your style best. I use a regular No. 2 wooden pencil. I love Ticonderoga Pencils. They are fairly inexpensive, have a great eraser, and don’t seem to break as much as traditional pencils. If you go with a wooden pencil, make sure to have a pencil sharpener in your arsenal of supplies. Mechanical pencils are great for smaller detail and you don’t have to worry about sharpening them.
There are a variety of artist pencils on the market and the difference is in the lead. The amount of smudging a pencil does will be based on hardness and how dark a pencil marks is based on blackness. No. 2 pencils fall in the middle of the hardness and blackness scales, so you can adjust accordingly.
Eraser.
My husband (The Coach) picks on me for being an eraser snob. I have only used White Pearl Erasers since high school. They don’t leave any smudge marks and are inexpensive.
Pencil Sharpener.
This is an area where I am not picky. I just use the simple pencil sharpener that came with my son’s Ticonderoga pencils. I know that some of you out there will prefer an electric pencil sharpener, but I prefer all of my tools be portable.
Colored Pencils.
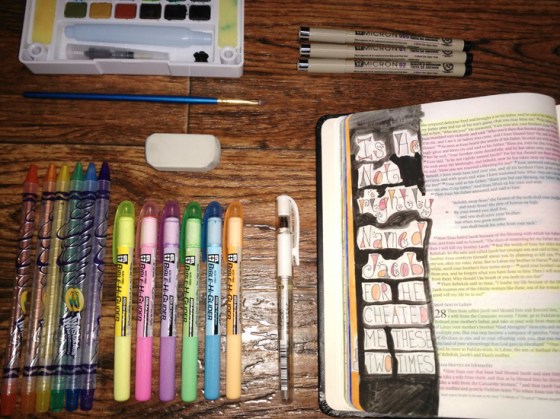
Crayola is the way to go here. I prefer Crayola Twistable Colored Pencils because they are pretty and you do not have to sharpen them. I started out with the traditional Crayola colored pencils. They worked fine until Swayze realized he loved the taste of wood. He has not even attempted to eat my Twistables (yet).
Pens.
I started my Bible Journaling journey with my favorite pen straight out of my pencil cup. It was a Uni-Ball Vision Pen and it glided over paper like butter and was fairly inexpensive. The ink was beautiful and dark and really made the colors on my page stand out. I was journaling on my son’s drawing paper, not in a Bible, so I did not really care about bleeding through.
Once I moved to my Bible, I switched to a pen from my bank. It worked fine for a few days. The ink was not bleeding through. The color was still standing out and the pen was free. However, I got tired of seeing the indentions on the next page from where I was writing. I was able to solve this problem some by placing a piece of cardstock between the pages while I worked; however, pressing down still showed up on the backside of the page.
I quickly went out to the craft store and bought Micron Ink Pens. These are an archival ink, which means they are going to be rich in color, be less likely to bleed through, and not fade away. They come in different tip sizes. I started out with an 01, 03, and 05 which range from 0.25mm through 0.45mm. Just as a frame of reference, most mechanical pencils have a tip of 0.5mm or 0.7mm. I love the fine tip because it really allows me to draw in fine detail. These pens come in bigger sizes and a smaller size as well. So far, I have discovered that I like my 005, 01, and 02 the most. I don’t like using the bigger sizes because I can see the shadow from where I have written on the back side of the page. These also come in a multicolored pack.
For the perfectionist, you may want to try Pilot FriXion Erasable Gel Pens. I do not have any personal experience with these; however, they have piqued my interest. They write like a ball point pen, come in a variety of colors and are erasable.
Watercolors.
I started off using a set of dollar tree watercolors from the kid’s craft section. I was reluctant to buy a set of Sakura Watercolors, but I was gifted a set at Christmas. They are in fact amazing. The colors are vibrant and I have a lot more options to choose from. My only complaint was the waterbrush that was included. It screws on counterclockwise, and I broke it by overtightening when I intended to open it. I simply use a regular paintbrush with the kit now, but you can purchase replacement waterbrushes if you need to.
Come back next week for a look at “Tips and Techniques for Non Artists.”
*Please, note that I get a small percentage of sales from the Amazon links above. However, I use all of these products myself (except where clearly noted) and I am personally recommending them to my readers.
