Prayer Against the Enemy


Lord,

You are a faithful God and nothing in all creation will ever be able to separate me from your love that is revealed in Christ Jesus our Lord (Romans 8:38-39). I will give thanks to you because your love endures forever (2 Chronicles 21). Help me to not have fear because you are with me. You will strengthen me, help me, and uphold me with your righteous hand (Isaiah 41:10).

Help me to recognize who my battle is truly against (Ephesians 6:12). I will surrender to you, Lord, because the battle is yours (2 Chronicles 15). I know that the enemy will flee from you (Psalm 68:1) and not have victory over me (Psalm 30:1). You will give me strength and protect me from him (2 Thessalonians 3:3). Be a light when I am in darkness (Micah 7:8). Keep me from temptation and guard me from the evil one (Matthew 6:13).

Amen

Chores For Young Kids

Start Them Young

Young kids love to help mom and dad. Take advantage of this. If your child can dump out a box of toys, he can place the toys back in the box. We started “cleaning up” with our son at 18 months of age. We started by helping him with most of his toys and gradually increased the number he was required to pick up.

Make Sure Chores are Age Appropriate

Young toddlers may only be able to sort their toys into baskets. Older toddlers can make their beds, put up their clothes, and dust low shelves. Older children can unload the dishwasher, run the vacuum cleaner, and take out the trash.

Show Your Kids What You Expect of Them

Provide clear instructions for your children and lead by example with a positive attitude. Written job descriptions and chore lists are great tools to use with any age child. For children who cannot read, make a list using pictures.

Find Joy in Your Work

Make chore time fun by turning your chores into games or having dance parties while doing your work. Spend time with your child by doing chores together. If your child sees you having fun cleaning, they will follow suit.

Reward A Job Well Done

Most importantly, make sure to reward a job well done, positive attitudes, and good work ethic. This does not have to be a physical rewards such as money or a treat. A simple “nice work” or “great attitude” will encourage good work in the future.

Free Printables: I have, Who Has? Number Review Cards

Number

Last week, I explained the game “I have, Who has?” for the letters of the alphabet. This game can also be used to review numbers.

Traditional Rules: Pass out all of the cards. Player one reads their first card. The player that has the next number goes next. Play continues until all cards are called.

Example:

  • Player One: “I have 4. Who has 2?”
  • Player Two: “I have 2. Who has 6?”
  • Player Three: “I have 6. Who has 3?”

The game can be played with 2-10 children (or 20 if you are using the 1-20 review cards).

To make the game more active, have each player perform an action for each card. For example, when player one asks “I have 4. Who has 2?” player two must hop two times. Activity suggestions include hopping, flapping arms, spinning in circles, clapping, etc.

Single Player Rules: Lay all but one card on the floor face side up. Read the remaining card out loud. Have your child find the next card and continue until all of the cards have been picked up.

Example:

  • First card reads: “I have 4. Who has 2?”
  • Find the next card: “I have 2. Who has 6?”
  • Find the next card: “I have 6. Who has 3?”

To make the game a bit more active, spread the cards around the room so that your child has to race around to find the next number. To add an extra challenge, place the cards face down so that your child has to remember where he saw the correct number.

Download my I have, Who Has-Numbers 1-10 Review“I have, Who Has” cards and I have, Who Has-Numbers 1-20 Review. Come back in the next couple of weeks for Shape Review and Color Review.

I recommend printing on cardstock and/or laminating the cards to make them more durable. I use the Scotch Thermal Laminator.

Bible Journaling: Tools of the Trade Part 1

Tools of the Trade1

The world of Bible journaling can be quite confusing because there are so many options out there. Today, I am discussing the type of Bible I use and the tools I use when reading. Remember, there is no right or wrong way to journal as long as you are spending meaningful time with the Lord.

Bible.

Pick a Bible translation that speaks best to you. I prefer the Holman Christian Standard Bible. It is the version my pastor uses and it is claimed to be faithful to the original Hebrew and Greek while also remaining readable. At the time I purchased my Bible, there was only one Holman available and it was expensive so I settled on the ESV Single Column Journaling Bible.

After you settle on a translation, you will have a variety of sizes, styles and colors. I chose a single column journaling bible with a plain black cover. I prefer the single column format because it is easy to read and my illustrations are next to the text they are referencing. I also picked out my Bible based on size. I wanted something small enough to toss in a diaper bag.

Bible Commentary.

I find a good Bible commentary to be helpful with reading my Bible. When I get to a passage I don’t understand, I enjoy reading more about it. Usually, there is some kind of historical or cultural significance that I did not pick up on. Commentaries are also great for linking passages back to other passages. You can use online commentaries or books, but be selective in choosing one. The Bible is God-breathed and authoritative. Commentaries are human written and therefore can actually contradict the Bible. When reading through scripture, always pray for wisdom and understanding from the Holy Spirit. Also, remember that the Bible was written for everyone, not just those that have been through seminary school. I use The Holman Illustrated Bible Commentary.

Highlighters.

Last week, I mentioned that I do a lot of highlighting in my Bible. Ordinary highlighters will bleed through your pages. However, several people use them with no problem. I would definitely test out any pen, paint or highlighter in your Bible before using them. You can use one of the reference pages at the front or back of your Bible as a test page.

When I first started Bible Journaling, I used Crayola crayons. They worked to keep me engaged in my reading; however, they had a bit of grittiness to them.

ACCU-Gel Highlighters are my highlighter of choice. I like a Bible highlighter that works more like crayon because it will not bleed through the page. These are very vibrant. The colors do not rub off, but they will leave a waxy feeling to your page for a day or so (this goes away quickly).

I have seen the Zebra Eco Zebrite Highlighters recommended, but I have not used these.

Storage.

Depending on where you plan on doing your Bible Journaling, you will need a way to store all of your tools. If you will always be journaling at the same desk and don’t need your tools to be portable, you can always use a pencil caddy and desk organizer for your supplies.

Otherwise, you will probably use some sort of bag for everything. Any bag will do for storage. Even a gallon size Ziploc bag works just fine. It is clear, so you can see everything at once and it is a very inexpensive option. Some people like to get a makeup case. Most of these have elastic holders designed for makeup brushes that allow you to keep your favorite pens organized easily. I personally use a zipper pouch from 31 Gifts.

Next week, I will discuss my favorite tools for illustrating the margins of my Bible.

*Please note, I get a small percentage of sales from the Amazon links above (except where noted). However, these are all products that I use myself and am personally recommending for my readers.


Bunnies, Chicks, and Jesus!

Easter is this Sunday and our son, the Champ, is getting to the age where we have to be more sensitive about Christian holidays. We want him to understand that Easter is the celebration of Christ’s victory over death. But we want him to be able to have fun celebrating the holiday as well. Below are the ways we will incorporate non-religious Easter traditions with our preschooler.

Egg Hunts

I spoke earlier this week about Resurrection Eggs. I love using these as a visual teaching tool. I believe that we can allow our son to participate in egg hunts and open up the eggs to get candy “prizes.” However, I want to stress to him through the use of Resurrection Eggs that our real Easter prize is Jesus.

The Easter Bunny

I will not be going out of my way to avoid the Easter Bunny. He is everywhere this time of year. Instead, I will be explaining to my son that the Easter Bunny is just something fun that some people do at Easter time and is not what this holiday is about.

Chicks, Flowers, Eggs, and Other Non-Religious Easter Symbols

All of the other non-religious Easter symbols are simply Spring symbols. This is easy enough to explain as a Christian parent. When we see pictures of Easter eggs and chicks, I can remind my son that many birds lay eggs during the spring time. The same applies for flowers. Lambs are usually considered by society to be a “non-religious” Easter image, so I can discuss Jesus’s role as a sacrificial lamb.

Easter Baskets/Presents

We will still give our son a Easter basket. However, we will clearly explain that this is a present from us, not the big bunny. His present will also be a religious gift. This year we are giving him God Is with Me: 365 Daily Devos for Boys (VeggieTales).

How do you celebrate Easter with your young children?

A Prayer for Work

This week’s prayer is a prayer about being a diligent worker. The Coach is in law school, and these verses are frequently posted in areas around our house. While they are particularly helpful for him as a student, they apply to us all. Everything that we do should be done “enthusiastically, as something done for the Lord and not for men” (Colossians 3:23). Whether we are students, working moms, or stay-at-home moms, everything we do is for the glory of the Lord (1 Corinthians 10:31).

Lord,

I will commit my work to you Lord and know that you will help me to achieve my plans (Proverbs 16:10). Help me to work cheerfully and enthusiastically (Romans 12:12). Help guard my heart so that I will labor without complaining (Philippians 2:14).

Everything I do is for Your glory (1 Corinthians 10:31). Help me to remember that I am working only to serve You and not others (Colossians 3:23-24). Through hard work, You will bless me (Proverbs 12:24) and You will allow me to bless those in need (Ephesians 4:28). Help me to not be lazy (Romans 12:11).

Amen

Products I Love: Resurrection Eggs

IMG_20160323_140641275

As a mom of a three year old boy, I appreciate anything that will help me explain the Bible in a real and tangible way. Easter is such a difficult concept for three year olds who do not have the attention span to listen to and comprehend the Easter story being read to them.

I purchased Resurrection Eggs because they claim that you can “See, Touch, and Hear the Story of Easter.”

The set comes with twelve eggs that each contain an item relating to the Easter story, a plastic container to store the eggs, a lesson booklet, and a sticker sheet. I was really impressed with the quality of the items.

The book contains twelve days of readings. Each day includes a Bible verse, a prompt for opening an egg, and a short devotional explaining the item inside the egg. The lesson takes less than five minutes to complete.

We started these 12 days before Easter. Each day we review the items we have already talked about, read the booklet, and then open a new egg.

We are on day number eight and I feel like he has really enjoyed them. While he does not have a full grasp of the story, as we review the items he remembers that “Jesus rode a donkey” and “Jesus prayed to God in the Garden.” For a three year old, I am very pleased with this.

I do recommend reading the booklet yourself before reading it to your child. Some parts of the story may need modifications to better fit your understanding of the Gospel. However, for the most part our family enjoyed the simplification of the story.

How do you celebrate and explain the Easter story to your young children?

*Please, note that I get a small fee from Amazon through the link above. However, I have purchased Resurrection Eggs and my family loves to use them to explain the Easter story.

IMG_20160319_202619

Free Printables: I Have, Who Has? Letter Review Cards

Letters

“I have, Who has?” is a pretty simple game that is common among early elementary grades. Traditionally, player one would read their first card. The player that has the next letter goes next. Play continues until all cards are called.

Example:

  • Player One: “I have A. Who has M?”
  • Player Two: “I have M. Who has K?”
  • Player Three: “I have K. Who has X?”

This game is great because it can be played with two players or twenty-six players. It is more fun with more players, making it a great game for classrooms.

But, homeschoolers that are playing with just mom may get overwhelmed by holding thirteen cards. So, I play an alternative version with the Champ.

I simply lay twenty-five cards in the floor face side up. I hand him the last card and we read it together. Then he has to find the next letter until all of the cards have been picked up.

Example:

  • Card one reads: “I have A. Who has M?”
  • The Champ finds the “M” card and reads “I have M. Who has K?”
  • The Champ finds the “K” card and reads “I have K. Who has X?”

To make the game a bit more challenging, you can place the cards face down. To get your child’s wiggles out while you play, spread the cards all over the room. They will have to run around to find the next card.

Download my I have, Who Has-Uppercase Letter Review and I have, Who Has-Lowercase Letter Review.

I recommend printing on cardstock and/or laminating the cards to make them more durable. I use the Scotch Thermal Laminator.

Bible Journaling: My Routine

Routine1

Last week I discussed WHY I enjoy Bible journaling. The next several weeks I will be discussing HOW I go about Bible journaling. It is important to remember that our main goal should be to grow closer to God through meaningful worship. That means that my routine may not be the best routine for you. Use it as a jumping off point and add to it or take out anything you need to.

Pray.

First and foremost, Bible journaling is a form of prayer and worship for me. I like to begin by asking the Holy Spirit to lead me and to instruct me as I am reading God’s Word. An example of this is as follows:

Lord,

Open my heart and mind as I read your word (Psalm 119:18). Give me the Spirit of wisdom and of revelation in the knowledge of you (Ephesians 1:17).  Help me to understand your instruction (Luke 24:45).

Amen

Read.

Before you can illustrate your Bible, you have to read it! I usually prefer reading one or two chapters at a time. Some people find reading one section at a time more manageable. Remember that QUALITY reading is more important than QUANTITY reading. We are attempting to KNOW our Lord more fully, not check off a Bible reading plan.

While reading, I keep a Bible dictionary and commentary nearby to answer any questions that may arise while reading.

Highlight.

I usually read with six highlighters. I have a category for each and I like to highlight my entire Bible as I am reading. This may seem like an excessive amount of highlightiting, but it serves two purposes: (1) I have ADHD, so by categorizing each verse, I am staying engaged while reading. (2) If I skip a chapter, I will be able to quickly come back to it because it is not highlighted.

My categories are as follows:

  • Pink- Warnings, Things Not to Do
  • Green- Commandments, Things to Do
  • Purple- God, Jesus, Holy Spirit
  • Blue-Promises, Blessings, Prophesy
  • Orange-Genealogy
  • Yellow- Anything else that “jumps out”

When I highlight, I do not try to overanalyze which color to use. There are several instances when Jesus is speaking (Purple) a promise (Blue) on the condition that we believe in him (Green). In that scenario, I will simply pick one of those colors to use. There are other scenarios where I do not know what category to use, so I simply highlight in yellow. Typically, I see yellow as a sign that I need to pull out a commentary to figure out what that passage is saying.

Reflect.

What does the passage mean? How does this apply to me?
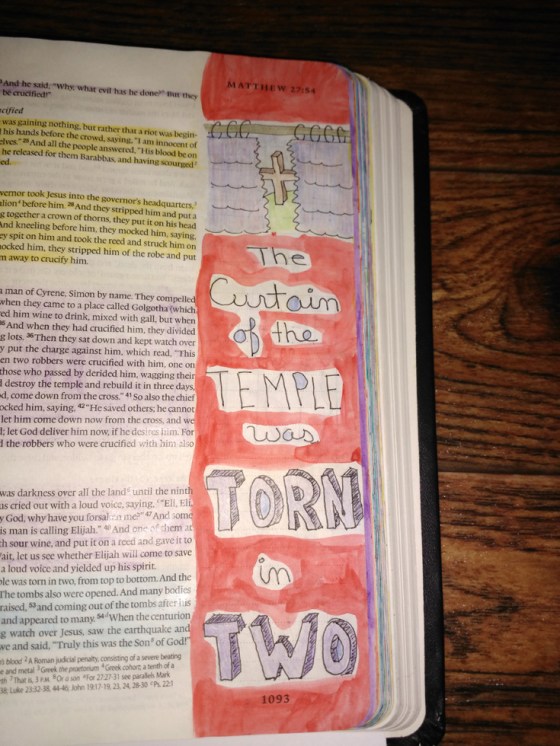
Sketch.

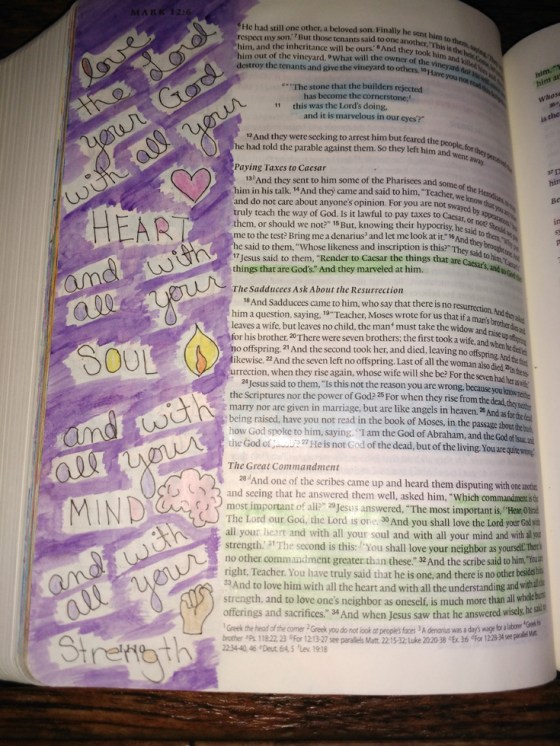
At this point I begin actually “journaling.” I like to turn on music at this point and use the time to further reflect on the passage and worship.

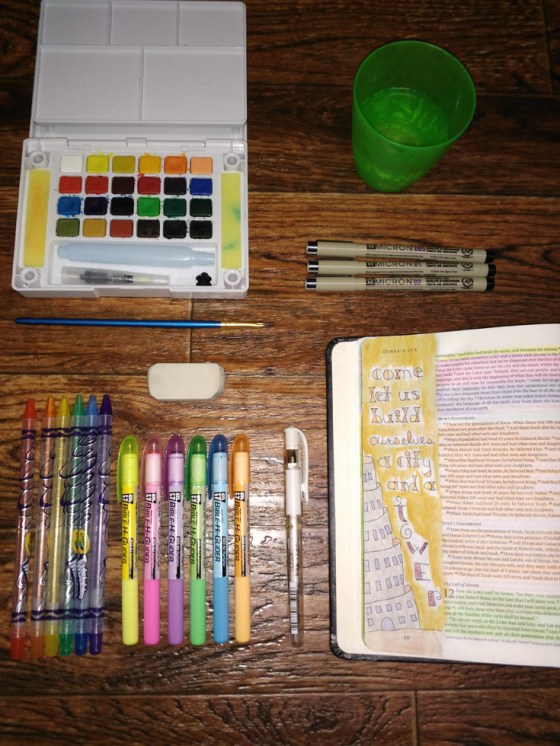
I begin the artistic process by sketching my complete design in pencil. Sometimes I will look online for “how to draw” tutorials if I do not know how to draw a particular element. I also like to look up lettering examples on Pinterest for my verses.

Color.

After I sketch in pencil, I trace the outline in an archival pen. Then I use my colored pencils to fill in the drawing. This is perhaps the most relaxing element of Bible journaling for me.

Paint.

If I am going to apply paint, I do it last. I use a watercolor paint that does well going around and over my pens and colored pencils.

Pray.

At the end of my journaling session, I like to close with a prayer in response to what I read. I like to give thanks for any revelations that may have come to me and ask for help applying what I have learned. My prayer may be as simple as:

Lord,

Let these words dwell within me (Colossians 3:16). I want to not only hear your word, but to be a doer of the word (James 1:22).

Amen

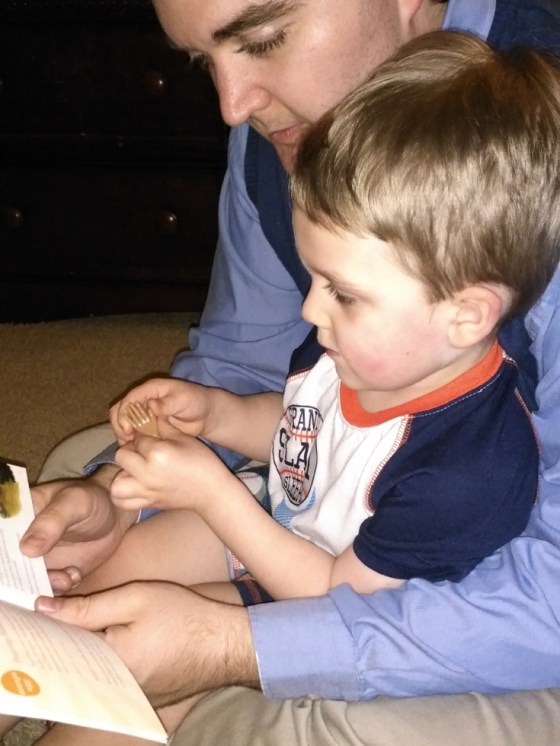
This is a simple outline of my typical journaling process. Some days, I only do part of my routine at a time (especially now with two boys); however, I do try to always begin and end in prayer.

Stay tuned next week for my favorite products for Bible journaling.

Routine2

Healthy Lunch Meal Prep: Sweet Potatoes, Chicken, and Sweet Peas

Healthy Lunch Prep 1

I like to prep healthy lunches for the week on Saturday, so that I can simply toss lunch in the microwave during the week.

This week, I am having sweet potatoes, chicken, and green peas.

I love sweet potatoes! They are incredibly dense in nutrients and have the potential to regulate blood sugar. Not to mention how unbelievably delicious they are.

Simply roast sweet potatoes and chicken. Cook a package of frozen peas according to the package directions. Then layer one cup sweet potatoes, one cup peas, and one cup chicken in a storage container. This dish pairs well with broccoli as well.

Typically, one container makes two adult size portions or a portion for one adult and two toddlers.

I freeze the containers I will be eating towards the end of the week and pull them out 48 hours before I plan to eat them.

Roasted Sweet Potatoes

  • 4 cups sweet potatoes
  • 2 tablespoons olive oil
  • 1 tablespoon cinnamon
  • 2 tablespoons honey or brown sugar (optional)

Preheat oven to 350 degrees. Peel and cube four cups of sweet potatoes. Drizzle with olive oil, honey, and cinnamon. Stir until potatoes are coated evenly. Roast for 30-45 minutes.

Paprika Chicken

  • 2 pounds boneless, skinless chicken breasts
  • ½ teaspoon garlic powder
  • ½ teaspoon paprika

Preheat oven to 350 degrees. Cut chicken breasts into 1” cubes and place in a single layer in a greased baking dish. Sprinkle seasonings over the chicken and bake for 30 minutes.